
A credit card authorization is your traveler's permission for you to charge their card. TravelBreeze™ sends them a secure form. They type in their card and agree. You can then see the card when you need to charge it.
TravelBreeze™ does not charge the card. You charge it yourself, outside of TravelBreeze™. Then you write down the payment.
Good to know: Any advisor who can see Form Studio at the top of the page can send this form. Only some people can see the full card. This page explains who.
Step 1: Get The Form Ready
You only do this once. After that, you can send the same form to any traveler.
The Quick Way: Use The Ready-Made Form
-
Look at the top of the page and click Form Studio.
-
Look under the big Form Studio heading and click Forms.
-
Scroll down the page to Start From A Template.
-
Find Client Credit Card Authorization. Click Use This next to it. Your own copy opens.

-
Click Save at the top right corner of the page.
The button turns green and says Saved. Then click the small back arrow at the top left corner of the page.
Your traveler types the amount and a description of the charges on this form. Tell them what to type before you send it. Its last step asks for a signature.
Stuck? If you do not see Start From A Template, build your own form instead. The steps are below.
The Other Way: Build Your Own Form
-
Look at the top of the page and click Form Studio.
-
Click Create A Form at the top right of the page.
-
Click Custom Form. The builder opens.
-
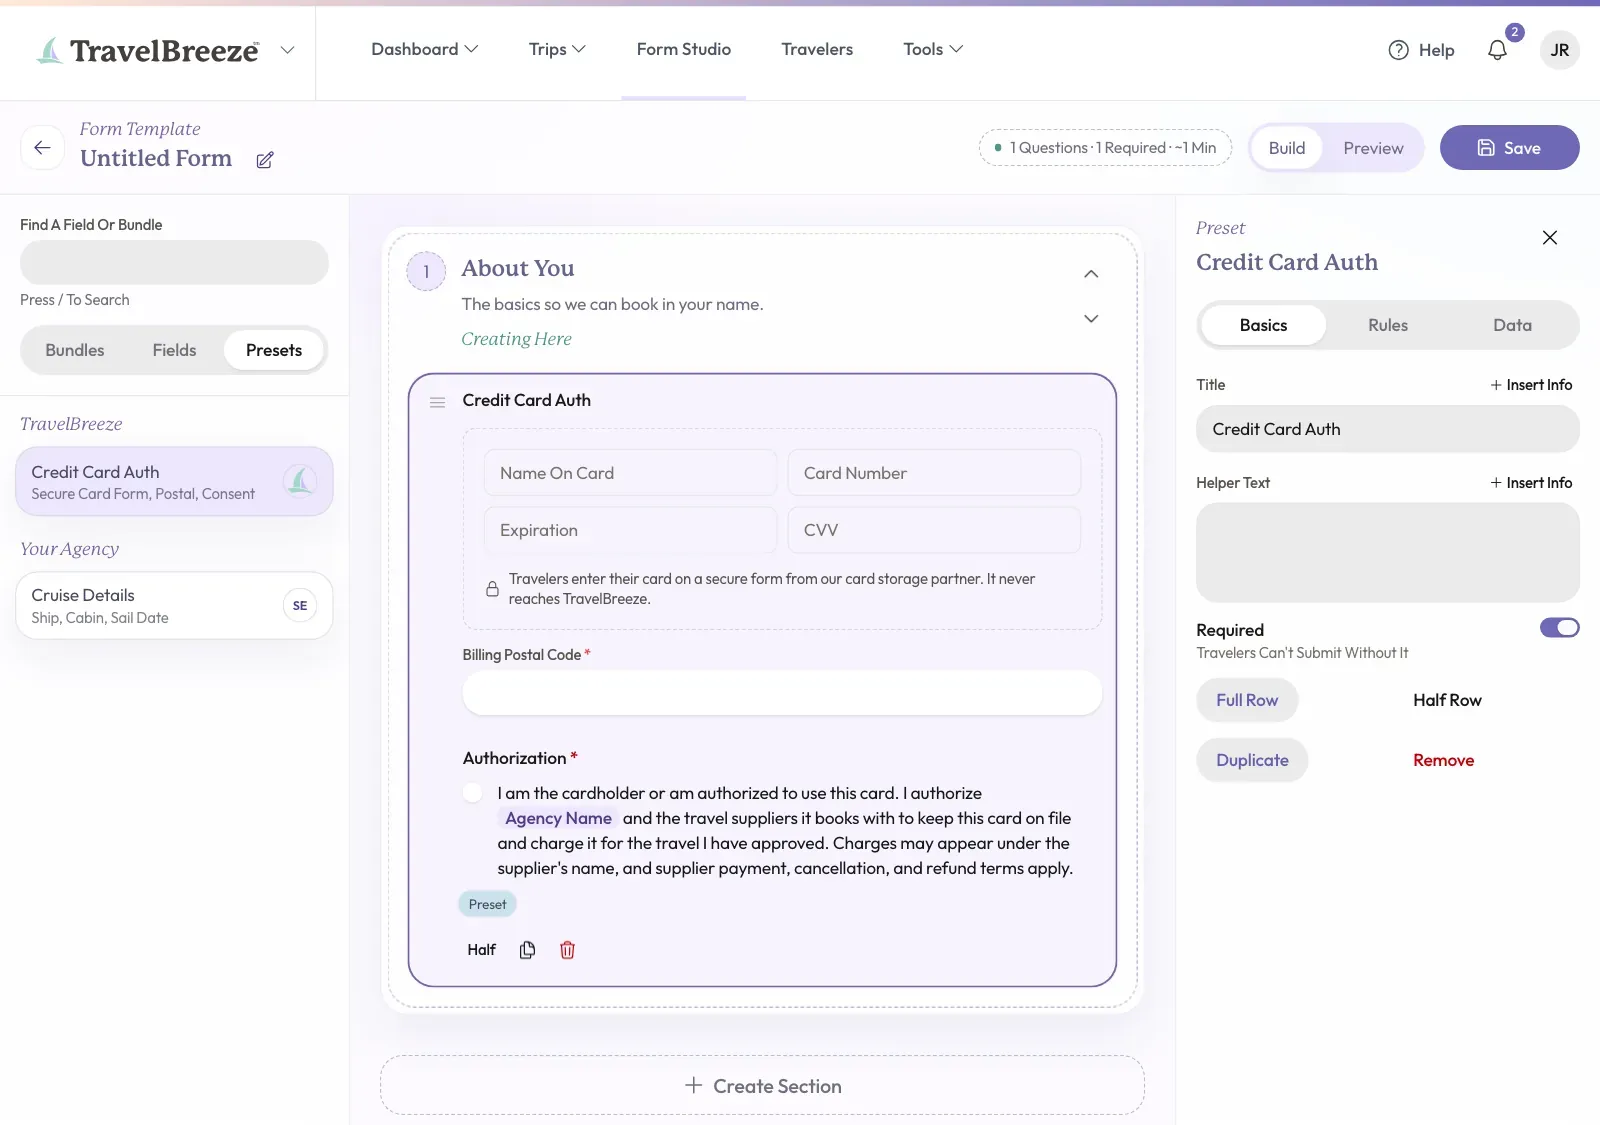
On the left side of the page, click Presets.
-
Click Credit Card Auth. It appears in the middle of the page.
-
Click the title at the top of the page. Type a name, like "Card Authorization".
-
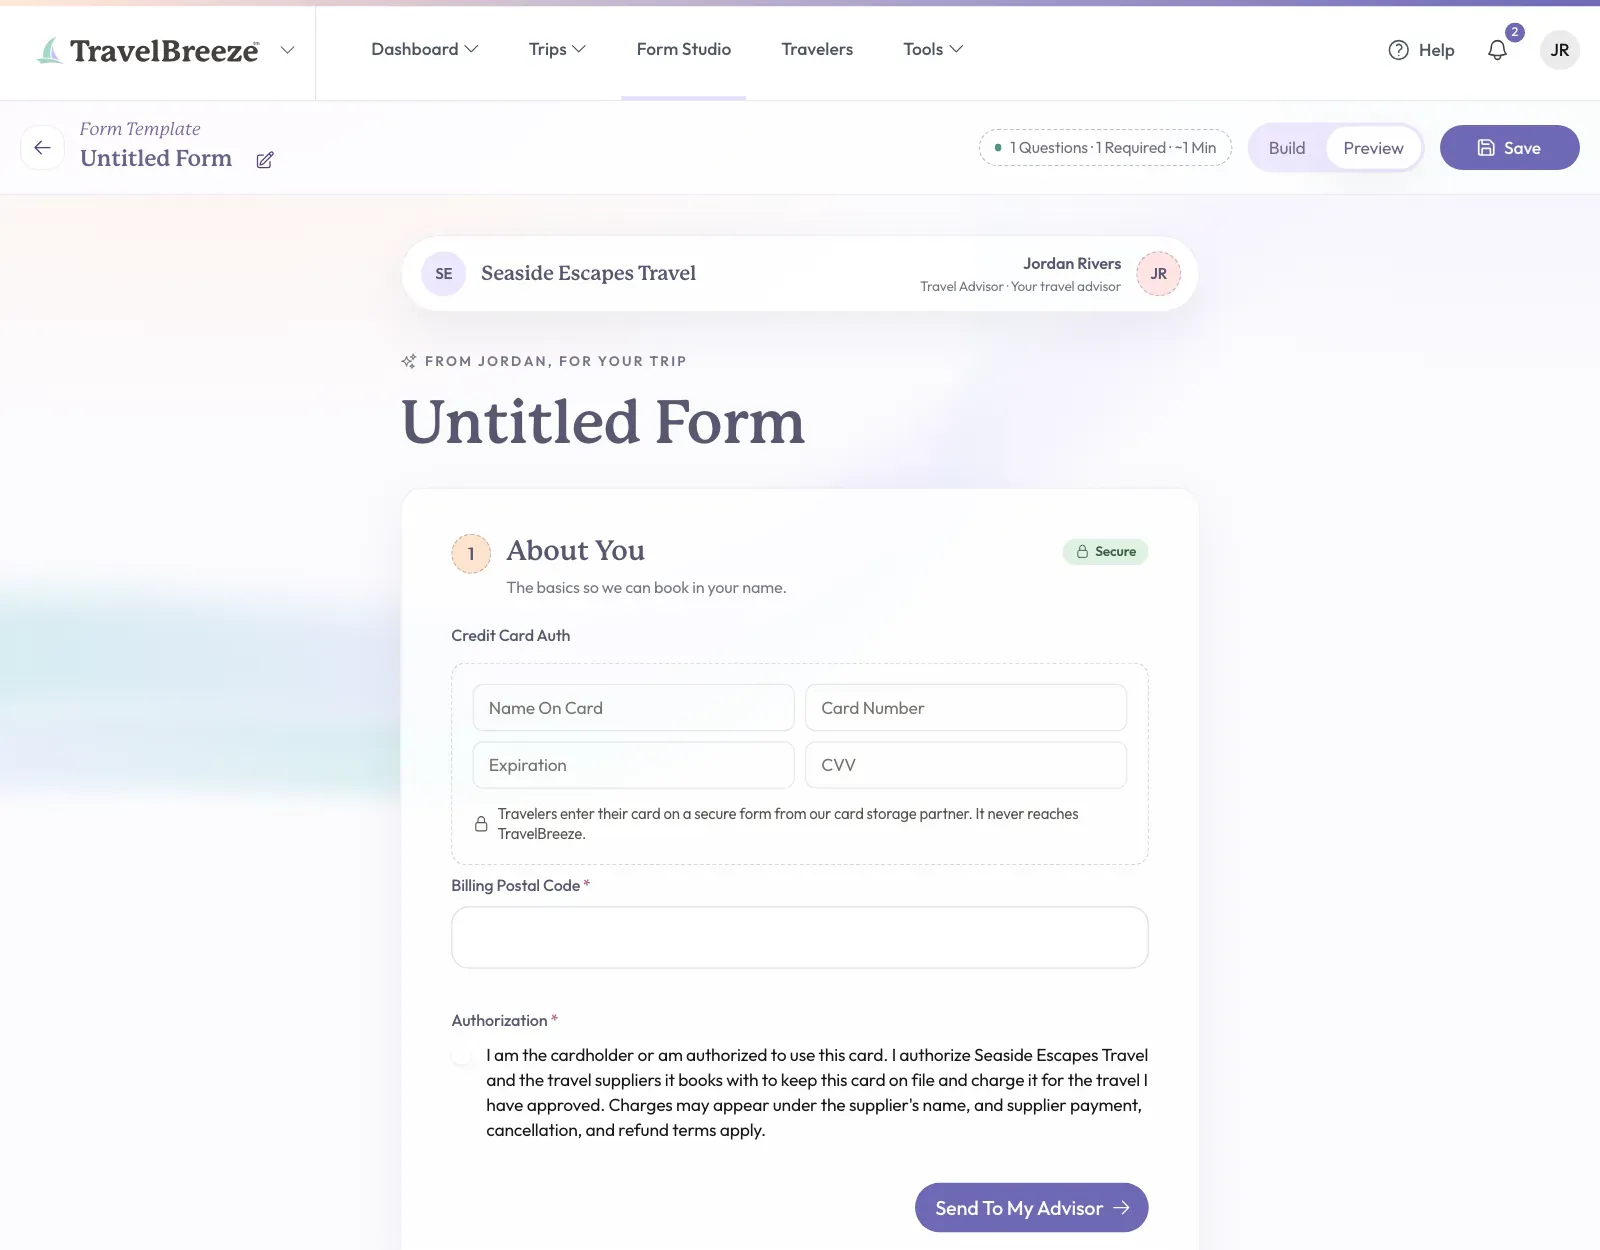
Click Preview at the top right to see what your traveler sees. The card boxes there are only a sample.
-
Click Build to go back.
-
Click Save at the top right corner of the page.
The button turns green and says Saved. Then click the small back arrow at the top left corner of the page.
Step 2: Send It To Your Traveler
-
Find your form's card on the Forms tab.
-
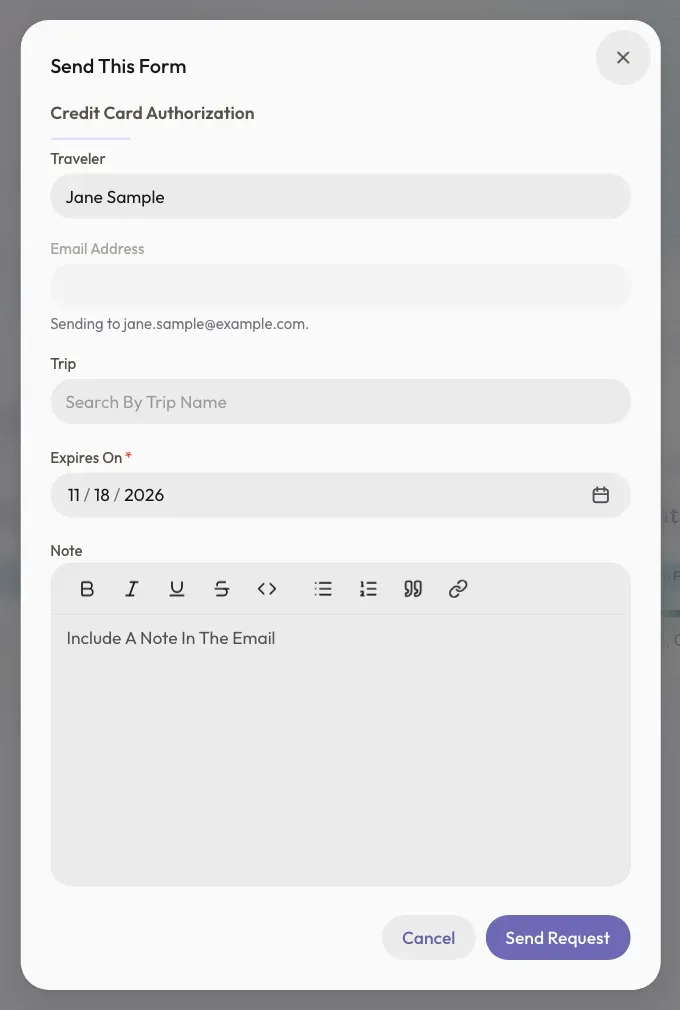
At the top right of the card, click the small paper airplane. A window called Send This Form opens.
-
Click the Traveler box and type the first letters of their name.
-
Click their name in the list.
-
Not in the list? Type their email in the Email Address box instead.
-
Click the Trip box and type the first letters of the trip name.
-
Click the trip in the list. This helps decide how long the card is kept.
-
Look at Expires On. This is the last day the link works. It starts 14 days from today.
-
You can type a message in the Note box if you want to. Never put card details there.
-
Click Send Request at the bottom right of the window.
You will see Form sent. The Requests tab opens, and your traveler's row says Sent.
If Sending Does Not Work
- Card storage isn't set up, so this form can't collect a card. Nothing was sent. Email us and we will help.
- The request is saved, but the email didn't send. Open it to copy the link. Click the row on the Requests tab. Click Send Again, or click Copy Link and paste the link into your own email.
- This form shows trip details. Choose a trip. Choose a trip in the Trip box, then click Send Request again.
- Cannot Be Contacted under a name means this traveler is marked Do Not Contact or Deceased. You cannot send to them.
- Missing Email Address under a name means they have no email. Type one in the Email Address box.
What Your Traveler Sees
You can read this to your traveler on the phone.
-
"You will get an email from TravelBreeze™. It says I sent you a form."
-
"Open the email and click Complete Form. You do not need an account."
-
"A page opens with questions. A red star means you must answer that one."
-
"Find the box for your card. It comes from PCI Booking, our secure card storage partner."
-
"Type the name on the card, the card number, the expiration date, and the security code."
-
"The security code is the 3 or 4 numbers on your card."
-
"Press the submit button inside that card box. Please do not skip this. It is easy to miss."
-
"The box changes. It shows your card type, the last 4 numbers, and the words Saved Securely."
-
"If you made a mistake, click Use A Different Card and type it again."
-
"Type your billing address or postal code."
-
"Read the words about permission. Click the check box to agree."
-
"Those words say you may use this card."
-
"They also say the agency and its travel suppliers may keep the card on file and charge it for travel you approved."
-
"Charges may show the supplier's name. The supplier's payment, cancellation, and refund terms apply."
-
"Click the big button at the bottom of the page."
-
"You will see Thank You. That means it worked, and you are done."
The ready-made form asks for permission a different way. Your traveler clicks Yes under I Authorize This Charge. They also type their name in the Sign Here box and fill in Date. They finish by clicking Authorize Card.
Your traveler is not charged by doing this. TravelBreeze™ keeps only the card type, the last 4 numbers, the expiration date, and the name on the card.
Careful: Your traveler should finish in one sitting. Their answers are not sent until they click the big button at the bottom of the page.
If Your Traveler Sees A Message
- Enter your card and press its submit button. They typed a card but did not press the button inside the card box.
- The secure card form timed out. The box stays open for 10 minutes. They click Reopen Card Form.
- The secure card form didn't load. They click Reopen Card Form.
- That card didn't go through. Please check it and retry. They check the numbers and type them again.
- We couldn't save that card. Please enter it again. They type the card again.
- This Form Has Expired means the last day has passed. Open the request and click Send Again. That gives them 14 more days.
- This Request Was Canceled means the request was stopped. Send a new one.
Step 3: See That It Came Back
-
Look at the top of the page and click Form Studio.
-
Click Requests, under the big Form Studio heading.
-
Find your traveler's row. On the right, it says Completed when they have finished.
The bell at the top right of the page can tell you too. Read Turn On Notifications And Text Alerts. You can also find the request on your traveler's Forms tab.
Step 4: Look At The Card
-
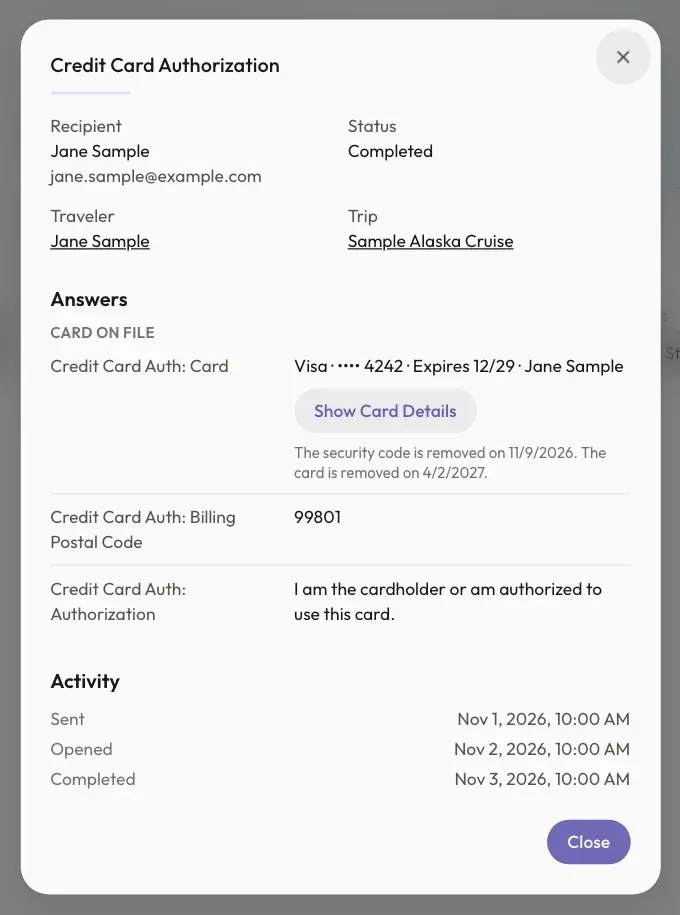
On the Requests tab, click your traveler's row. A window opens.
-
Scroll down to Answers. You will see the card type, the last 4 numbers, the expiration date, and the name.
-
Click Show Card Details. The full card and security code appear in a box.
-
Copy them where you need them to charge the card.
-
The box hides itself after 60 seconds. You can watch the time count down next to it. To hide it sooner, click Hide Card.
Here is what to know about looking at a card:
- Who can click Show Card Details: the person who sent the form, the agency owner, and agency admins.
- Who cannot: Staff, and the advisor who owns the traveler if someone else sent the form. They only see the last 4 numbers.
- It is written down: each look shows as Card Viewed under Activity in the same window.
- There is a limit: the security code can be shown up to 10 times for each card.
- You must wait for them to finish: you cannot see the card until your traveler sends the whole form.
Careful: Do not copy the card into notes, files, or email. Look at it only when you are ready to charge it.
Step 5: Charge It And Write It Down
-
Charge the card outside of TravelBreeze™, with your supplier or your own card machine.
-
Write down the payment. Follow Record A Payment From A Traveler.
-
In the Reference Number box, type only the last 4 numbers of the card.
When The Card Gets Removed
TravelBreeze™ removes the card by itself. The request window shows the exact dates, under the card.
- The security code is removed 30 days after your traveler enters the card. It goes sooner if the card goes sooner.
- The card is removed 7 days after the latest payment due date on the trip.
- With no trip, no payment dates, or a date already passed, the card is removed 30 days after it was entered.
- If you click Cancel Request, any card on that request is removed soon after.
- If your traveler replaces a card, the old card is removed soon after.
These dates are set when your traveler enters the card. They do not move later, so charge the card before then. After that, the request says This card was removed. If you still need it, send the form again.
There is no button to remove a card after your traveler has finished.
Keep Card Details Out Of Everything Else
Only use Credit Card Auth for a card. Please do not ask for card details any other way.
- Do not ask for a card in any other form question. TravelBreeze™ stops you from saving a question with a name like "Card Number". You will see a message like "Card Number" asks for card details. Use the Credit Card Auth preset instead.
- Do not ask for a card in a PDF. TravelBreeze™ cannot read the words printed on your PDF, so nothing stops this.
- Do not ask for a card by email or text.
- Do not type a security code anywhere in TravelBreeze™. This includes notes and files.
Only collect a card when you have a lawful reason and your traveler has agreed. Use it only for that reason. Read our Terms of Service and Privacy Policy to learn more.
Good to know: Your Travel Pipeline has a stage called Authorizations. You can use it to remember which trips are waiting for a card. Read Move A Trip Through Your Process.
Good to know: The Authorizations box on My Dashboard still says Coming Soon. So does the Payments tab on a traveler's page. They are separate. Use the steps on this page.
Stuck? Email us at [email protected]. Please do not send us card details.